RAISED KERB EXTERNAL CORNER
Training hub – all your questions answered!
For the best results, please follow the instructions below.
If you still have questions, please feel free to contact us using the form.
STEP 1
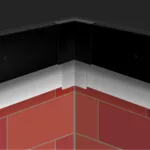
Create an effective corner (ready for Raised Kerb Trim External Corners to be fitted) by butt-joining two lengths of Raised Kerb Trim where they meet at an external right angle.
Make sure to leave a 4mm expansion gap.


STEP 2
Carefully ‘snap out’ both corner backing plate pieces by lifting them up and out of the component.
(Only snap-out the Raised Kerb Trim side of the component if joining Raised Kerb Trim to Gutter Trim at the external corner. See Bonus Step below.)
STEP 3
Apply super glue to ONE inside edge of the Raised Kerb Trim External Corner component.
(Only one side is superglued to allow for any expansion of the joined lengths of Raised Kerb Trim.)


STEP 4
Apply the uPVC superglue activator to the Raised Kerb Trim corner area where the superglued inside edge of the Raised Kerb Trim External Corner component is to be affixed.
STEP 5
Firmly press the External Corner component down and into the Raised Kerb Trim butt-joined corner, holding it in place until the adhesion is solid.


Bonus Step
How to join Integra Trim Raised Kerb Trim to Integra Trim Gutter Trim at an external corner.
Where Raised Kerb Trim meets Gutter Trim at an external corner, corner fittings incorporating both types of trim must be created.
Butt-join each length of trim as usual and use Raised Kerb Trim corner components to join them following the steps above (making sure to only snap-out the Raised Kerb Trim side of the corner component).


